Creative Boho Nails Ideas for Every Season
Embracing the bohemian style can beautifully extend to your nails. With its colorful, free-spirited, and artistic flair, boho nails give you room to express your creativity every season. Here are some inspiring boho nails ideas tailored to match the vibe of each season, so you can stay stylish all year long.
Spring Boho Nails
As flowers bloom and colors come alive in spring, let your nails reflect that vibrancy too. Here are some eye-catching ideas to try:
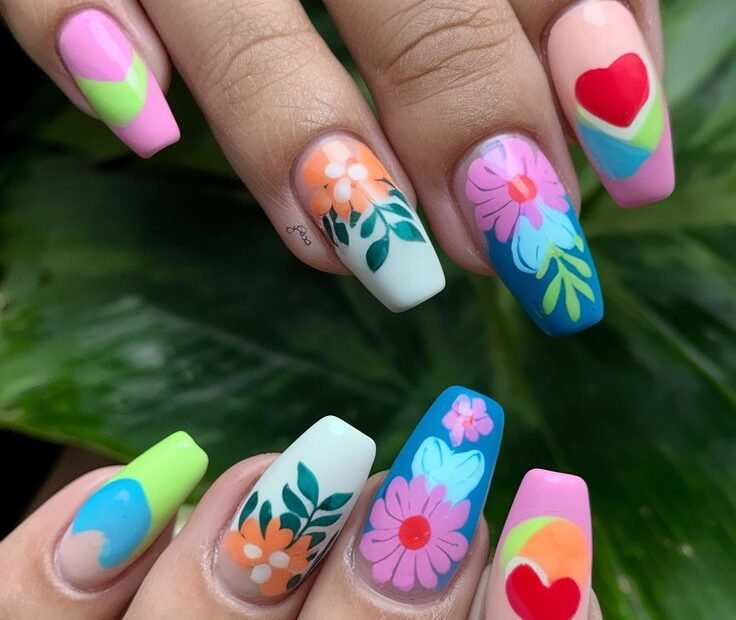
- Floral Patterns: Paint delicate flowers in pastel shades like lavender, mint green, and blush pink. Use a thin brush for intricate designs.
- Pastel Ombré: Blend two or more pastel colors for a soft ombré effect. You can add small white dots to mimic spring blossoms.
- Geometric Shapes: Combine soft earth tones with lines and triangles to create unique geometric art for a modern bohemian touch.
Summer Boho Nails
Summer is the season for playful colors and designs. Here’s how to bring that boho vibe to life:
- Tie-Dye Effect: Use a sponge to dab on bright summer colors like turquoise, orange, and yellow for a tie-dye look.
- Beachy Nails: Create a sandy beach effect using tan and seafoam green, and add tiny shell decals for a fun summer touch.
- Tribal Patterns: Go bold with tribal-inspired designs using vibrant colors. Focus on zigzags and dots for a striking appearance.
Autumn Boho Nails
Autumn brings warm hues and a cozy vibe. Try these boho nail ideas to capture the essence of fall:
- Earthy Tones: Utilize deep oranges, browns, and rusty reds. A solid color with a matte finish looks particularly chic.
- Leaf Motifs: Paint small leaves in gold and copper shades for a subtle nod to the changing season.
- Abstract Art: Combine various shades of greens, yellows, and browns to create abstract patterns that resemble the beauty of autumn landscapes.
Winter Boho Nails
When winter arrives, your nails can sparkle and shine with creativity. Here’s how to achieve that perfect winter boho nail art:
- Winter Wonderland: Use icy blues and whites to create a snowflake design. Don’t hesitate to add some glitter for a festive touch.
- Muted Winter Shades: Try soft greys paired with soft pinks or nudes for a chic yet understated look.
- Layered Designs: Experiment with layering patterns, such as snowflakes over a marble base, to add depth and dimension.
Boho Nails Tips for Every Season
No matter the season, here are some essential tips to keep your boho nails looking fabulous:
- Use Quality Polish: Invest in good quality nail polish for long-lasting wear and vibrant colors.
- Experiment with Textures: Incorporate different finishes like matte, glossy, or textured for added interest.
- Add Jewel Accents: Tiny jewels or rhinestones can elevate your boho design and give your nails a trendy flair.
Each season offers a unique opportunity to reinvent your look, and boho nails are the perfect canvas for your creativity. Don’t hesitate to mix and match styles, colors, and patterns to express your inner bohemian spirit. Whether you’re heading to a summer festival or enjoying a cozy autumn evening, these boho nails ideas will keep your fingertips fabulous. Embrace your individuality and let your nails shine throughout the year!
How to Achieve the Perfect Boho Nail Art at Home
Getting that perfect boho nail art look at home can transform your everyday style. Bohemian nails are often characterized by vibrant colors, unique patterns, and a relaxed yet artistic vibe. If you want to achieve stunning boho nails, follow these tips to create eye-catching designs that reflect your free spirit.
Gather Your Tools
Before starting your boho nail art, you need to collect the right tools. Here’s what you’ll need:
- Nail polish in various colors (think earthy tones and vibrant hues)
- Nail art brushes or dotting tools
- Sticker decals or stencils for intricate designs
- Top coat for a glossy finish
- Base coat to protect your nails
- Acetone and cotton pads for clean-up
- Nail file and buffer for shaping
- Cuticle oil to keep your nails healthy
Choose Your Color Palette
Your color choices set the mood for your boho nail art. Popular colors for boho designs include:
- Deep greens
- Soft browns
- Burnt orange
- Bold reds
- Turquoise and other vibrant shades
- Neutral tones like taupe or beige
Mix and match these colors to create a unique palette that resonates with your style. Don’t hesitate to experiment with shades, as the boho aesthetic thrives on individuality.
Prep Your Nails
Start with clean, polished nails. Here’s how:
- Remove any old polish: Use acetone and cotton pads to wipe away the old nail polish.
- Shape your nails: Use a nail file to shape your nails as you like, whether square, round, or almond-shaped.
- Buff the surface: Gently buff your nails to remove any rough spots.
- Apply cuticle oil: Massage cuticle oil into your cuticles for a healthy look.
- Add a base coat: Apply a layer of base coat to protect your natural nails from staining.
Creating Boho Designs
Now comes the fun part—creating your boho nail art! You can be as creative as you like. Here are a few design ideas:
- Feather Patterns: Use a thin brush to draw feather shapes on a light background. Select colors that pop against the base.
- Mandala Designs: Create small circles and intricate patterns using a dotting tool. Blend different colors for a beautiful layered effect.
- Geometric Shapes: Try using tape to create clean lines and blocks of color. You can fill some sections with different shades for a vibrant look.
- Floral Accents: Paint tiny flowers or vines on your nails. Add details in contrasting colors for dimension.
- Tie-Dye Effects: Use a sponge to dab on different colors, blending them for a fun tie-dye effect.
Finishing Touches
Once you’re happy with your nail art, let it dry completely before applying a top coat. This step is crucial to protect your designs and give your nails a beautiful shine. Here’s how to seal in your artistic work:
- Apply a top coat: Use a clear top coat to enhance shine and longevity.
- Let it dry: Allow ample drying time to avoid smudging the design.
- Moisturize: Once dry, apply cuticle oil again to keep your nails and cuticles nourished.
Care for Your Boho Nails
To maintain your boho nail art, avoid exposing your nails to excessive water or harsh chemicals. Regularly apply cuticle oil and keep your nails trimmed to prevent breakage. Remember, healthy nails are essential for stunning nail art.
With these steps, you can easily achieve beautiful boho nails at home. Don’t be afraid to express your creativity and let your personality shine through your nail art!
Conclusion
Embracing boho nails is not just about aesthetics; it’s a celebration of individuality and creativity. With the diverse range of boho nails ideas suitable for every season, you can keep your nail art fresh and exciting all year round. From warm earthy tones in the fall to bright florals in the spring, each season offers endless inspiration for your nail designs. elements like geometric shapes, bead accents, and delicate patterns further enhances the bohemian vibe, allowing you to express your unique style.
If you’re looking to achieve the perfect boho nail art at home, don’t be daunted by the process. With a few essential tools and some practice, you can recreate stunning designs without needing to visit a salon. Techniques like using dotting tools for intricate details or sponge techniques for beautiful gradients can elevate your nail art game. Remember, the aim is to enjoy the process and let your creativity flow, so don’t hesitate to experiment with colors and styles that resonate with you.
As you explore these boho nails ideas, consider how you can make them your own. Whether it’s through personalized color combinations, unique patterns, or even combining several techniques, your nails can be a true reflection of your bohemian spirit. So, dive into this colorful world and let your fingertips become a canvas for your artistic expression. There’s no limit to what you can create, and the best part is that boho nails are perfect for everyone, regardless of skill level. Happy crafting!